 The Cyano Codex
Printable step wedge for calibration (PDF)
As an Amazon Associate I earn from qualifying purchases. How we fund the site

In short
- Three 21-step wedges, from 0 to 100% gray, already mirrored to print on transparency film.
- A step wedge printed at home compares; it doesn’t measure: its densities depend on your printer, your ink and your film.
- Read it dry: the last step with the deepest blue and the first one that comes out white.
- Those two readings go into the Digital Negative Maker, which fits the negative to your usable range.
A4: 2-page PDF · 101 KB. Letter: 2-page PDF · 101 KB. Print at 100%, without “Fit to page.” You can print and share it for free, unmodified.
On this page (4 sections)
What is a printable step wedge for?#
A printable step wedge lets you see, in a single exposure, which grays in your negative reach the paper. Exposed alongside your prints, it shows up to which step the deepest blue reaches and from which one it comes out white: that range is the one your negative should use.
To spread the tones well, a digital negative needs a curve made from a step wedge printed, exposed and measured for each combination of process, paper and printer1. The National Science and Media Museum also recommends a step wedge for working out the exposure time2. How to expose it and read it step by step is in step wedge for calibration.
A step wedge for comparing, not a calibrated step wedge#
A step wedge printed at home has no known densities. Its 21 grays are percentages in the file, from 0 to 100%, and how much light each step blocks depends on your printer, your inks and your film3. It’s for comparing tests made with the same materials, not for measuring.
On top of that comes the lamp’s spectrum, which also changes how the negative responds3. Not even all black inks block ultraviolet equally: in the inkjet printers Reeder and Anderson tested, photo black blocked less than matte black4. That’s why the step wedge is printed with the same materials as your negatives, and its reading only holds for them.
Density measures how much light an area of the negative blocks: each additional 0.30 lets through roughly half as much5. A printed step wedge doesn’t give you those numbers; it only shows up to which step the blue reaches.
What’s included#
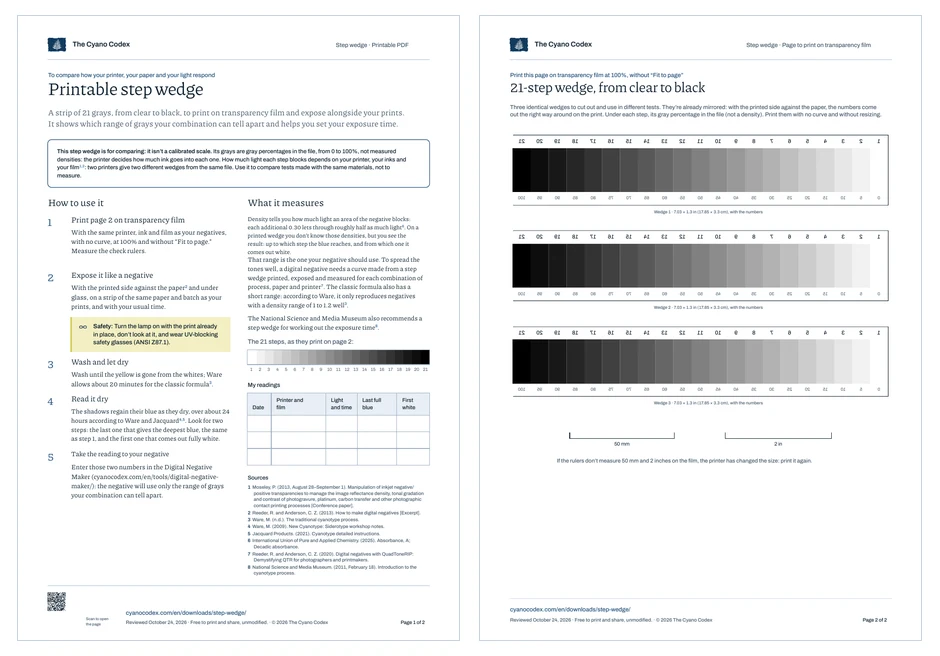
- An instruction page in five steps, with what the step wedge measures and what it doesn’t, and a table to record three readings.
- Three 21-step wedges, from clear to black, with their number above and their gray percentage below, already mirrored to print on transparency film.
- Two check rulers, 50 mm and 2 inches, to make sure the printer hasn’t changed the size.
- Short-form sources at the foot of the page, the review date and a QR code that brings you to this page.
How to use it#
- Print page 2 on transparency film with the same printer, ink and film as your negatives, with no curve, at 100% and without “Fit to page.”
- Expose a step wedge on a strip of the same paper as your prints, with the printed side against the paper4 and with your usual time.
- Wash it, let it dry and read it the next day. The shadows regain their blue as they dry, over about 24 hours according to Ware6. Note the last step with the deepest blue and the first one that comes out white, and enter them in the Digital Negative Maker for cyanotype.
Safety: Turn the lamp on only once the print is in place, don’t look at it, and wear UV-blocking safety glasses. More on safety
The step wedge has to be printed on transparency film made for your type of printer. How to choose it is in transparency film for cyanotype negatives.
Frequently asked questions
Why isn’t a printed step wedge a calibrated step wedge?
Because its grays are percentages in the file, and how much light each one blocks is decided by your printer, with its inks, on your film. From the same PDF, two printers give two different step wedges. That’s why it’s for comparing tests made with the same materials, not for measuring densities.
Is it the same as the step wedge in the Digital Negative Maker?
It’s the same idea: 21 steps, from clear to black. The one in the Digital Negative Maker prints next to your image, on the same sheet and with your settings, or on its own, with or without your curve. This PDF is for anyone who prefers to print it separately, with three step wedges to cut out.
How often should I repeat the step wedge?
Every time you change a component: the printer, the ink, the film, the paper, the chemistry or the lamp. If nothing changes, a step wedge now and then confirms that everything is still the same. Record each reading with its date in the table on page 1.
Your next step

Sources
- Reeder, R. and Anderson, C. Z. (2020). Digital negatives with QuadToneRIP: Demystifying QTR for photographers and printmakers. Routledge. https://doi.org/10.4324/9781003017806
- National Science and Media Museum. (2011, February 18). Introduction to the cyanotype process. National Science and Media Museum Blog. https://blog.scienceandmediamuseum.org.uk/introduction-cyanotype-process/ Accessed October 17, 2026.
- Moseley, P. (2013, August 28–September 1). Manipulation of inkjet negative/positive transparencies to manage the image reflectance density, tonal gradation and contrast of photogravure, platinum, carbon transfer and other photographic contact printing processes [Conference presentation]. Impact 8 International Printmaking Conference. https://uwe-repository.worktribe.com/output/929438 12
- Reeder, R. and Anderson, C. Z. (2013). How to make digital negatives [Excerpt]. In C. Z. Anderson, Gum printing and other amazing contact printing processes. Reproduced on Freestyle Photographic Supplies. https://www.freestylephoto.com/alternative-process/making-digital-negatives 12
- International Union of Pure and Applied Chemistry. (2025). Absorbance, A; Decadic absorbance. In Compendium of chemical terminology (5th ed., online version 5.0.0). https://goldbook.iupac.org/terms/view/A00028 Accessed October 16, 2026.
- Ware, M. (2009). New Cyanotype: Siderotype workshop notes. https://www.mikeware.co.uk/downloads/CyanoWork.pdf Accessed October 17, 2026.
Reviewed on October 16, 2026. If you spot an error or a missing source, write to us and we’ll look into it.