 The Cyano Codex
Botanical negative templates (printable PDF)
As an Amazon Associate I earn from qualifying purchases. How we fund the site

In short
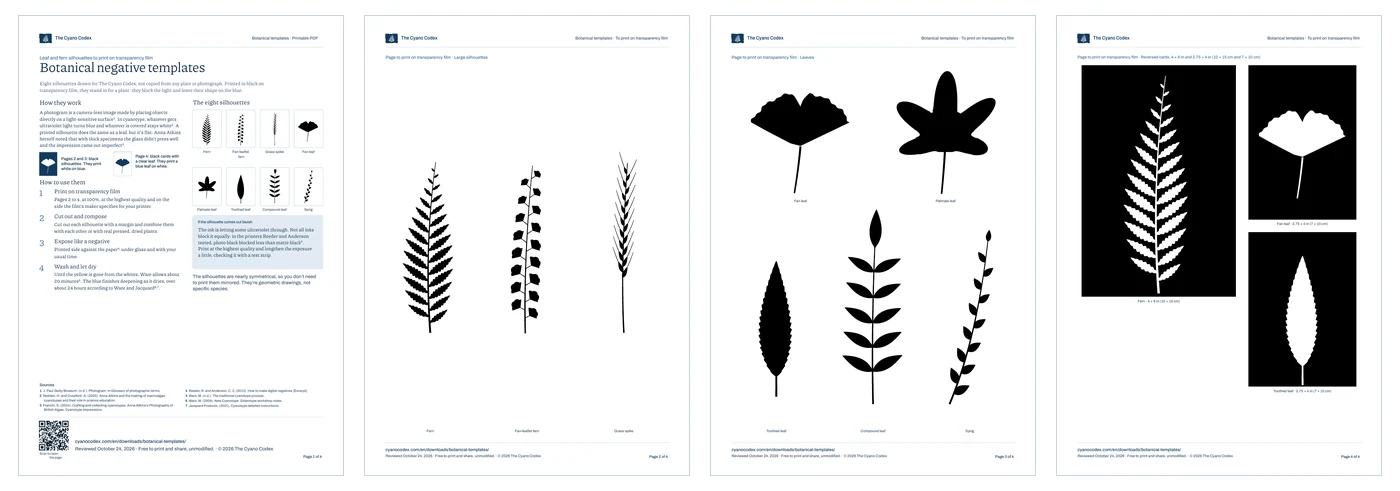
- Eight silhouettes: ferns, a grass spike, a fan-shaped leaf, palmate, toothed and compound leaves, and a sprig.
- Printed in black on transparency film, each silhouette comes out white on blue, like a real leaf.
- Three inverted cards do the opposite: a blue leaf on a white background.
- They’re flat, so they give sharp edges without pressing anything.
A4: 4-page PDF · 294 KB. Letter: 4-page PDF · 293 KB. Print at 100%, without “Fit to page.” You can print and share it for free, unmodified.
On this page (4 sections)
What are botanical negative templates for?#
Botanical negative templates let you make leaf cyanotypes without depending on the season or on pressing plants. Printed in black on transparency film, they’re placed on the coated paper like a photogram: whatever the silhouette covers stays white and the rest turns blue.
A photogram is an image made without a camera, by placing objects directly on a light-sensitive surface1. In cyanotype, the areas that receive ultraviolet light turn blue and the covered ones stay white2. A printed silhouette stands in for the plant, with one advantage: it’s flat. Anna Atkins already warned in the preface to her book that, with thick specimens, the glass didn’t press down well and the impression came out imperfect in places3.
If you’d rather work with real plants, botanical cyanotype explains how to choose, press and compose them.
What’s included#
- An instruction page with a sample sheet of the eight silhouettes, how they work and what to do if one comes out bluish.
- Two pages of black silhouettes, at large size: two ferns and a grass spike on one; a fan-shaped leaf, a palmate leaf, a toothed leaf, a compound leaf and a sprig on the other.
- A page of inverted cards, 10 × 15 cm and 7 × 10 cm: a black background with the leaf clear, to get a blue leaf on white.
- Short-form sources at the foot of the page, the review date and a QR code that brings you to this page.
How to use them#
- Print pages 2 to 4 on transparency film, at 100%, at the highest quality and on the side the manufacturer specifies for your printer.
- Cut out, compose and expose with the printed side against the coated paper4, under glass and with your usual time.
- Wash until the yellow is gone from the whites and let it dry: the blue finishes deepening over about 24 hours, according to Ware5.
If a silhouette comes out pale blue instead of white, the ink has let ultraviolet through. Not all inks block it equally: in the inkjet printers Reeder and Anderson tested, photo black blocked less than matte black4. To draw your own templates, or turn a photo into a negative, see how to make a cyanotype negative.
Transparency film for your type of printer#
The silhouettes are printed on transparency film, and inkjet film doesn’t work in a laser printer, or the other way around. How to choose yours is in transparency film for cyanotype negatives.
Frequently asked questions
Are the silhouettes of real plants?
No. They’re geometric drawings made for this site: they’re reminiscent of a fern, a grass spike or a palmate leaf, but they don’t represent specific species or copy any plate, photograph or artwork. If you’re after the exact shape of a plant, use the plant, pressed and dried.
Can I combine the templates with real plants?
Yes. Printed silhouettes and pressed plants go together on the same paper, under the same glass. Bear in mind that a thick plant doesn’t sit as flat against the paper as the film does, and its edge will come out less sharp.
Why did my silhouette come out pale blue instead of white?
Because the ink let part of the ultraviolet light through. Not all inks block ultraviolet equally, and the film and the print quality matter too. Print at the highest quality and check the result with a test strip before the final print.
Your next step

Sources
- J. Paul Getty Museum. (n.d.). Photogram. In Glossary of photographic terms. https://www.getty.edu/art/collections/glossary/g341.html Accessed October 16, 2026.
- Redden, H. and Crawford, A. (2025). Anna Atkins and the making of macroalgae cyanotypes and their role in science education. Applied Phycology, 6(1), 1-8. https://doi.org/10.1080/26388081.2024.2435049
- Franchi, S. (2024). Crafting and collecting cyanotypes: Anna Atkins's Photographs of British Algae: Cyanotype Impressions. Literature Compass, 21(1-3), Article e12708. https://doi.org/10.1111/lic3.12708
- Reeder, R. and Anderson, C. Z. (2013). How to make digital negatives [Excerpt]. In C. Z. Anderson, Gum printing and other amazing contact printing processes. Reproduced on Freestyle Photographic Supplies. https://www.freestylephoto.com/alternative-process/making-digital-negatives 12
- Ware, M. (2009). New Cyanotype: Siderotype workshop notes. https://www.mikeware.co.uk/downloads/CyanoWork.pdf Accessed October 17, 2026.
Reviewed on October 16, 2026. If you spot an error or a missing source, write to us and we’ll look into it.