 The Cyano Codex
Cyanotype quick guide (printable PDF)
As an Amazon Associate I earn from qualifying purchases. How we fund the site

In short
- Mike Ware’s formula: 25 g of citrate and 10 g of ferricyanide, each in 100 ml.
- Seven steps, from mixing the solutions to letting the blue finish developing as it dries.
- At each step, the sign that it’s going well: pale yellow paper, bronzed shadows, whites with no yellow.
- Every fact carries its source at the foot of the page, and a QR code takes you to this page.
A4: 1-page PDF · 120 KB. Letter: 1-page PDF · 119 KB. Print at 100%, without “Fit to page.” You can print and share it for free, unmodified.
On this page (4 sections)
What is the cyanotype quick guide?#
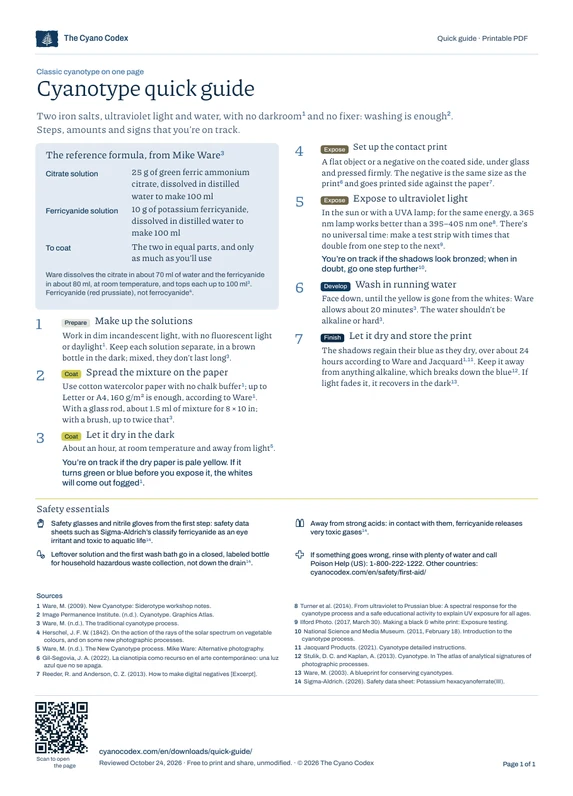
The cyanotype quick guide is a one-page summary of the classic process, to print and keep in view in your workspace. It brings together the reference formula, the seven steps with the sign that each one is going well and the safety essentials. Every fact carries its number and its source at the foot of the page.
It doesn’t replace the full explanation: it’s meant for when you already know what you’re doing and just need the figures in front of you. The whole process, with the reason for each step, is in how to make a cyanotype step by step.
What’s included#
- Mike Ware’s reference formula: 25 g of green ferric ammonium citrate and 10 g of potassium ferricyanide, each in distilled water to 100 ml, mixed in equal parts1.
- Seven steps with stage and color: mix, coat, dry, set up the contact print, expose, wash and let dry.
- The signs that you’re on track: the dry paper should be pale yellow, because if it turns green or blue the whites will come out fogged2; and the exposure is done when the shadows look bronzed3.
- The working figures: about 1.5 ml of mixture with a rod for 8 × 10 in1 and about 20 minutes of washing in running water, according to Ware1.
- The safety essentials: goggles and gloves, acids kept away and the first wash bath to the hazardous waste collection point, with the reference to the safety data sheet4.
- Short-form sources, the review date and a QR code that brings you to this page.
How to use it#
- Download it in your paper size. Choose Letter or A4 to match the paper your printer uses: the content is the same.
- Print it at 100%, without “Fit to page.” That way the small print at the foot of the page stays legible.
- Hang it where you work, away from the wet area. If it gets solution on it, print another: don’t use it as a rest for bottles or brushes.
The guide doesn’t give an exposure time, because there’s no universal one. It gives you the method: a test strip with times that double from one section to the next5. To make one, download the test strip.
If you’re starting with powdered chemistry#
The guide uses Ware’s formula, which you make up by weighing the two chemicals. If you’d rather not weigh anything, a powdered chemistry set comes with the two salts already measured out in bottles you just add water to; in that case, follow the manufacturer’s proportions instead of the guide’s. How to work with the powders and solutions safely is in cyanotype safety.
Frequently asked questions
Can I use the quick guide with a cyanotype kit?
Yes, except for the formula: if you use a kit, mix the solutions with the manufacturer’s quantities and instructions, because each one uses its own proportions. The other steps, from coating to drying, and the signs that you’re on track are the same.
Can I print the guide for a workshop or a class?
Yes. You can print and share it for free as many times as you like, as long as you don’t modify it. If you hand it out at a workshop, the Letter and A4 versions have the same content; choose the one for the paper your printer uses.
Why doesn’t the guide give an exposure time?
Because there isn’t one that works for everyone: it depends on the formula, the light that day or your lamp, and the paper. The guide gives you the method, a test strip with doubling times, and the sign that the print is exposed: the shadows look bronzed.
Your next step

Sources
- Ware, M. (n.d.). The traditional cyanotype process. Mike Ware: Alternative photography. https://mikeware.co.uk/mikeware/Traditional_Cyanotype.html Accessed October 16, 2026. 123
- Ware, M. (2009). New Cyanotype: Siderotype workshop notes. https://www.mikeware.co.uk/downloads/CyanoWork.pdf Accessed October 17, 2026.
- National Science and Media Museum. (2011, February 18). Introduction to the cyanotype process. National Science and Media Museum Blog. https://blog.scienceandmediamuseum.org.uk/introduction-cyanotype-process/ Accessed October 17, 2026.
- Sigma-Aldrich. (2026). Ficha de datos de seguridad: Hexacianoferrato(III) de potasio (version 11.0, ref. 244023). https://www.sigmaaldrich.com/ES/es/sds/sigald/244023. Accessed October 16, 2026.
- Ilford Photo. (2017, March 30). Making a black & white print: Exposure testing. https://www.ilfordphoto.com/exposure-testing/ Accessed October 16, 2026.
Reviewed on October 16, 2026. If you spot an error or a missing source, write to us and we’ll look into it.