 The Cyano Codex
Exposure test strip (printable PDF)

In short
- Six sections with doubling times, from 1 to 32 units of your choice.
- A table tells you when to cover each section with the card and leaves room for the actual time.
- The number strips, on transparency film, leave each number white over its section.
- Read it with the strip dry, the next day, once the shadows have regained their blue.
A4: 2-page PDF · 132 KB. Letter: 2-page PDF · 132 KB. Print at 100%, without “Fit to page.” You can print and share it for free, unmodified.
On this page (4 sections)
What is an exposure test strip?#
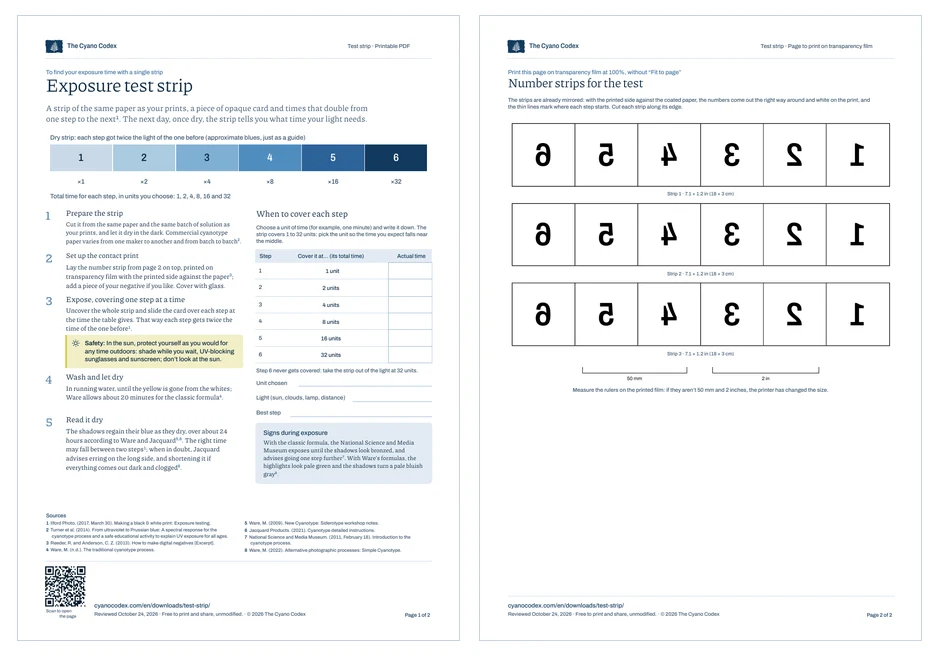
A test strip is a strip of the same coated paper as your prints, exposed in sections at different times so you can pick the right one afterward. The classic method doubles the time from one section to the next, and the correct time may fall between two sections1. This template organizes it into six sections.
Each section is covered with a card when its time is up, so the first gets the least light and the last gets the most. The full method, with published times and how to read the color, is in cyanotype exposure time.
What’s included#
- Five steps, from cutting the strip to reading it dry, with the reference for each fact.
- A times table: when to cover each section (1, 2, 4, 8 and 16 units; the sixth reaches 32) and a box for the actual time.
- The signs during exposure: with the classic formula, bronzed shadows and one step more2; with Ware’s formulas, pale green highlights and shadows in a pale bluish gray3.
- Three 18 × 3 cm number strips, already mirrored to print on transparency film, and two check rulers, 50 mm and 2 inches.
- Short-form sources at the foot of the page, the review date and a QR code that brings you to this page.
How to use it#
- Print page 1 on paper and page 2 on transparency film, at 100% and without “Fit to page.” Measure the check rulers to confirm the scale.
- Cut a strip of the same paper, from the same batch, as your prints. Even commercial cyanotype paper responds differently depending on the manufacturer and the lot4, so a strip of another paper measures something else.
- Expose, wash and read it dry the next day. The shadows regain their blue as they dry, over about 24 hours according to Ware5. If you’re torn between two sections, Jacquard advises erring on the side of overexposure6.
Safety: When exposing in the sun, protect yourself as you would for any time outdoors: shade while you wait, UV-blocking sunglasses and sunscreen; don’t look at the sun. More on safety
Log each strip in the cyanotype exposure log sheet, which has a card to stick it next to its data, or in the in-browser Exposure Log.
Why the number strips go on transparency film#
The numbers on page 2 are black ink on transparency film: they block the light, so on the strip they stay white against the blue of each section. That way, when you read it, you know which section is which. The page is already mirrored so that, with the printed side against the paper, the numbers come out the right way around7.
Frequently asked questions
What time unit should I choose for the test strip?
One that puts the time you expect in the middle of the strip. The template runs from 1 to 32 units: if you think your print will need a few minutes under your light, a one-minute unit puts that time in the middle sections. If all the sections come out the same, repeat with a larger or smaller unit.
Can I print the number strip on plain paper?
No. The number strip sits on the coated paper during the exposure, so it has to let light through: it’s printed on transparency film. The instruction page, on the other hand, goes on plain paper. Print both at 100%, without “Fit to page.”
Does the test strip work for fabric?
Yes, with a strip of the same fabric and the same batch of solution as the final piece. Each surface responds differently, so the time a paper strip gives you doesn’t hold for fabric. The method, the sections and reading it dry are the same.
Your next step

Sources
- Ilford Photo. (2017, March 30). Making a black & white print: Exposure testing. https://www.ilfordphoto.com/exposure-testing/ Accessed October 16, 2026.
- National Science and Media Museum. (2011, February 18). Introduction to the cyanotype process. National Science and Media Museum Blog. https://blog.scienceandmediamuseum.org.uk/introduction-cyanotype-process/ Accessed October 17, 2026.
- Ware, M. (2022). Alternative photographic processes: Simple Cyanotype [PDF instructions]. https://mikeware.co.uk/downloads/SimpleCy22.pdf Accessed October 16, 2026.
- Turner, J., Parisi, A. V., Downs, N. and Lynch, M. (2014). From ultraviolet to Prussian blue: A spectral response for the cyanotype process and a safe educational activity to explain UV exposure for all ages. Photochemical & Photobiological Sciences, 13(12), 1753-1764. https://doi.org/10.1039/c4pp00166d
- Ware, M. (2009). New Cyanotype: Siderotype workshop notes. https://www.mikeware.co.uk/downloads/CyanoWork.pdf Accessed October 17, 2026.
- Jacquard Products. (2021). Cyanotype detailed instructions [Manufacturer instructions, version 08.17.21]. https://cdn.shopify.com/s/files/1/0053/5540/5423/files/Cyanotype_Instructions.pdf Accessed October 16, 2026.
- Reeder, R. and Anderson, C. Z. (2013). How to make digital negatives [Excerpt]. In C. Z. Anderson, Gum printing and other amazing contact printing processes. Reproduced on Freestyle Photographic Supplies. https://www.freestylephoto.com/alternative-process/making-digital-negatives
Reviewed on October 16, 2026. If you spot an error or a missing source, write to us and we’ll look into it.